
HOW TO TURN A TOTEBAG INTO A SKIRT in 10 (somewhat) EASY STEPS
Supplies: scissors, self-adhesive Velcro, black duct tape, a totebag or two made from plasticized paper or _____ (insert actual name of this material here)
1.) Cut the straps off one totebag.
2.) Remove the seams that connect the bottom panel to the rest of the bag and remove one of the bag’s side seams, so you’re left with a long rectangle consisting of 4 panels (2 wide, 2 short). To remove the seams, I recommend carefully snipping the seam threads, rather than removing a couple of threads then tugging at the seam tape. The latter will cause you to shred the sides of the panels. (Yes, I learned this so that you wouldn’t have to.) Throw away the cloth seam tape, unless you can find some clever use for recycling it. If you’re working with tall rectangular totebags like the HP7, the bottom panel of your bag will be shorter than the side panels, so you can throw this out as well. (Again, unless you can think up a clever use for it.)
3.) Plant yourself in front of a mirror and wrap the 4-panelled rectangle around your hips. If it easily encircles around your derriere and overlaps by maybe five or more inches, congratulations! You’re skinny enough to require only one totebag for this project. If, like me, you’re better-equipped for birthing, take another totebag and repeat steps one and two, as you’re going to need to steal an extra panel (or more) to be sure you can breathe in your little totebag number.
4.) Once you’ve got a sense of how many panels you should add to your skirt, you’ll probably want to go back to your original 4-panelled rectangle and remove all the seams so you won’t have ridges sticking out of the skirt wherever the panels meet. You could theoretically leave the original seams in (as I originally thought I would), but those ridges are likely to make your life difficult when you get to step #6 (adding darts).
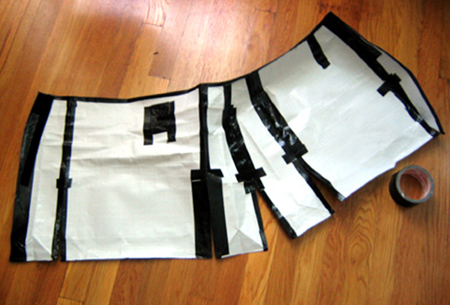
5.) If you removed the side seams from your 4-panelled rectangle, you’ll now need to replace them and return them to their long rectangle shape, using (drum roll please…) duct tape. Lay the panels out side-by-side in the order you want their patterns to progress around your skirt (here’s a place where you can be creative!) and center a long piece of duct tape (a bit longer than the height of your panels) over the seam where they meet. (It doesn’t matter if your panels are face-up or face-down when you do this.) Wrap the ends of the tape over the top and bottom of the panels. If you’re adding an extra panel (or panels) to your skirt, add it/them to those from your original 4-panelled rectangle in the same fashion.
After you’ve done this for all the seams and you’re back to having one big rectangle again (consisting of 4 panels + however many you added), flip the big rectangle over and do the same thing to the other side. This will anchor your seams AND give your skirt a nice streamlined appearance. (Vertical lines = good.)
6.) Stand in front of the mirror and wrap your bigger, now flatter rectangle around your hips again, then take a deep breath, as this is the point where things get a bit tricker. If you’re a woman whose hips are larger in circumference than your waist (as is usually the case), you’re likely to have a sizeable gap between the very stiff waistband of your soon-to-be-skirt and your actual waist. (Just like what would happen if you wrapped a rectangle around a sphere.) To eliminate that gap in material this stiff, you’ll have to make darts (angled seams) at the top of your skirt, so that it’ll curve with you.
While holding your soon-to-be-skirt around your hips with your left hand, take your right hand and pinch the fabric along the back of your right hip, so that the soon-to-be-skirt’s waistband now lays against your actual waist on your right side. Note how much you’ve pinched and see how the fabric pinched between your fingers forms a triangle that’s wider at the top of your skirt and then narrows away to nothing as the skirt rounds its way over your derriere. Hold onto that triangle as you let go of the skirt with your left hand, then take your scissors and cut the triangle off along its longest side. Take another strip of duct tape and tape your skirt back together, so that the top edges of the skirt are touching again. The panels of your skirt will curve toward one another when you do this step, so it helps if you picture yourself taping it together inside a bowl — the bottom edge of your sliced dart will meet at a wider point than the top edge (your waistband).
Go back to your mirror. How’s the skirt fitting now? Better on one side, probably, so do the same thing to the other side. Still have a funny gap in another place? Add another dart. And maybe another one if you were timid that first time. Eventually you’ll have solved the problem and your skirt will fit like a plasticized paper dream.
7.) When you think your darts have done the trick, wrap a long, long piece of duct tape (cut into shorter pieces if that makes it easier) over the top edge of the waistband so you won’t get scratched by the bag material.
8.) Wrap your on-the-verge-of-being-a-skirt around your waist again and notice how much it overlaps. Be sure to leave a bit of extra "give" so that you’ll be able to SIT in the darn thing, then stick that self-adhesive Velcro in between your overlapping pieces, so that you can rrrrrrrrrrip! take that skirt off and put it back on again in no time flat.
9.) If you want to be sure you can walk comfortably in your skirt, consider cutting slits partway up the seams between your skirt panels, like I did. Cover over the each sides of the split seam with more duct tape and place a short piece of duct tape across the top of the slit in letter "T" fashion, to keep it from ripping any further as you raise your knees.
10.) Put on your new totebag skirt and pat yourself on the back. CONGRATULATIONS!
Below you’ll see how my skirt looked from the back, after I added a duct tape pocket when I realized I’d need a place to put my office key. Some of my seams below had to be reinforced at the end of the night, as they were showing signs of wear (a.k.a. pulling apart a bit in the middle). Of course all I did to remedy this was reinforce them with more duct tape. If only all tailoring jobs were this cheap!

Dear Alison – I love reading your blog, but I wish you’d write more regularly. Too often I find myself coming to read new stuff and only finding old posts. I know you are busy but I just wanted to express my desire for more Shelftalker! Thanks.
Bette N., Thank you SO much for being such a loyal reader and for wanting MORE ShelfTalker! In order to deliver more posts per week I either need to write shorter posts (a challenge) or work more abbreviated hours (a dream). If one of those things starts happening, though, by virtue of visiting this site so frequently you’ll be one of the first to know! Thanks for making me feel so good about the work I’m currently doing here. Best, alison